

You framed the shot perfectly, then checked it later and found a stranger walking through the background, a soda can on the ledge, or cables slicing across the sky. The good news: you no longer need expensive desktop software to fix these problems. Browser-based editors can handle object removal surprisingly well once you understand which tool fits which situation.
Know Your Three Weapons
Nearly every online photo editor offers some combination of three removal tools, and choosing correctly is half the battle:
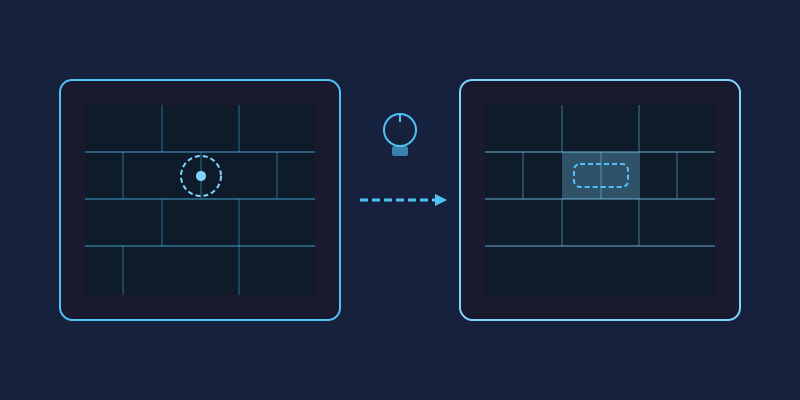
- Clone stamp: copies pixels from one area and paints them over another. You control exactly what gets placed where, making it ideal for structured surfaces like brick walls, fences, and tiled floors.
- Healing brush: samples nearby texture but blends it with the surrounding color and lighting automatically. Perfect for skin, blemishes, and small marks where texture matters more than exact placement.
- Fill or erase selection: you outline an object, and the editor rebuilds the covered area by analyzing the edges around it. Best for larger objects sitting against fairly uniform backgrounds like grass, sand, water, or sky.
Removing People From Backgrounds
Start with the selection method: draw loosely around the person, including a few pixels of background beyond their outline. The fill algorithm needs context to reconstruct what was behind them. If the person stands against a busy scene, expect to clean up afterward with short strokes of the clone stamp along edges where the reconstruction looks smeared. Work from the outside of the removal area inward.
Erasing Trash, Wires, and Small Clutter
Power lines are the classic annoyance. Because they are thin and cross relatively smooth skies, they respond beautifully to the healing brush. Drag along the line in small segments rather than trying to cover the whole cable in one stroke; shorter passes blend better. For litter and small debris on pavement, the clone stamp wins because sidewalks and roads have directional texture that automatic fills often scramble.
Cleaning Up Skin and Blemishes
Temporary marks like pimples vanish almost instantly with the healing brush. Set the brush slightly larger than the blemish, click once, done. Resist the temptation to scrub entire faces; keeping natural texture like pores and faint lines is what separates tasteful retouching from the uncanny wax-figure look. Remove distractions, not identity.
A Practical Order of Operations
- Remove the largest objects first, since big fills change the surrounding area.
- Fix medium clutter next, checking edges at high zoom.
- Finish with tiny specks and dust at 100 percent magnification.
- Zoom out and view the whole image before exporting; removal artifacts often hide until you see the full frame.
When Removal Goes Wrong
If a patched area looks blurry or repetitive, undo and try a different source point for your clone stamp, or shrink your brush size. Repetitive patterns are the telltale sign of cloning from one spot too many times. Vary your sampling location frequently and the patch becomes invisible. And remember: every edit stacks, so fixing a bad patch usually takes less effort than piling more edits onto it.
Plan Before You Patch: Survey All Distractions First
Before you touch a single brush, zoom out until the whole frame fits on screen and scan it like a proofreader hunting typos. List every distraction you can find: the stray shoe in the corner, the car peeking from behind the tree, the dust speck in the sky. Jumping straight at the most obvious object usually means discovering three more halfway through, by which point your undo history is a tangle of half-finished patches. In miniPhotoShop, duplicate your layer first so the original stays untouched underneath. Then work in a deliberate order: small specks first to build momentum, large fills last while your eye is fresh.

Matching Texture, Light, and Perspective When Cloning
The clone stamp copies pixels faithfully — sometimes too faithfully. If your source area was lit from the left but the destination sits in shadow, the pasted texture glows like a spotlight, so always sample from a region sharing the same lighting direction, depth, and surface angle as your destination. Perspective matters equally: pavement tiles recede toward the horizon, meaning foreground texture looks enormous when stamped into the background. Sample near where you paint so apparent sizes match, and avoid mirror-symmetric cloning — copying the left window onto the right one creates perfect repeats that viewers subconsciously notice. Working on a duplicate layer and nudging your source point between strokes keeps repetition invisible.
Removing People From Landmarks and Travel Shots
Every postcard shot of a famous monument comes with tourists welded into the frame. Select each person with the lasso or magic wand when they stand against sky, water, or plain stone, because those backgrounds rebuild beautifully; people crossing textured areas need short clone-stroke cleanup afterward to restore railings, columns, and rooflines. Work person by person rather than grabbing the whole crowd at once; each removal leaves cleaner surroundings for the next. Bags and tripods often extend beyond your selection and leave floating fragments behind. Finish by lifting leftover footpath shadows with a soft healing pass.
Cleaning Power Lines, Poles, and Other Thin Distractions
Cables, fence wires, antennas, and lampposts share one property: they are long, thin, and cross complicated backgrounds. Beginners drag one giant stroke down the entire length. Treat every line as a chain of short segments instead, healing twenty or thirty pixels at a time so each repair blends against its own local sky, leaves, or rooftop instead of smearing textures across boundaries. For vertical poles, sample immediately left and right and walk downward, alternating sources so no seam appears. Check every junction at high zoom, since stubs love to hide there.
Common Mistakes That Make Edits Obvious
Most failed edits fail for the same handful of reasons. Repeating patterns top the list: clone the same leaf cluster five times and the eye instantly spots the rhythm. Soft smudge blobs come next — dragging an oversized soft brush over a hard-edged object turns crisp architecture into foggy mush that reads as an error. Wrong shadow removal betrays countless edits too: the object vanishes but its painted-on shadow remains. The cure for all of these is disciplined checking. Toggle your edited layer's visibility off and on to compare results, inspect suspect regions with the zoom tool at full magnification, and step back through the undo history when a patch drifts from bad to worse.

Frequently Asked Questions
Is removing objects from photos legal?
Editing your own photographs for artistic or commercial presentation is standard practice. Do not use removal to fabricate evidence, mislead in journalism, or violate contest and stock-platform rules.
Will object removal lower my image quality?
Slightly, inside the patched region. Fill and healing rebuild pixels statistically, so heavily edited areas can soften at full resolution, though the effect stays hidden in normal viewing.
Which miniPhotoShop tool should I try first?
Start with healing for spots and thin wires, switch to the clone stamp for structured surfaces, and reserve selection fill for large objects on even backgrounds. When one result looks wrong, undo and reach for the next tool.
How do I remove a large object without leaving a blur?
Fill the interior generously, then rebuild structures crossing the area with short clone strokes. Uniform regions tolerate big fills; edges and repeating patterns need manual touch-up.
Can I fix an old edit that went wrong?
If you duplicated the layer before editing, delete the copy and start again from the untouched original beneath. Otherwise step back through the undo history to just before trouble started.
With nothing more than a browser tab, you can rescue photos you would have deleted a decade ago. Open an image with visible clutter and practice on a copy; within ten minutes the techniques become muscle memory.